Weaving project 29: colour and weave sampler (abandoned)
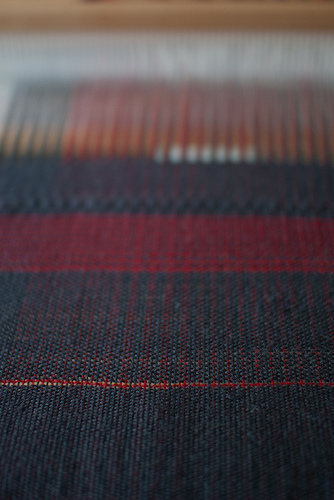
Having decided to do a sampler as my 2nd rigid heddle project, I decided I’d use the color-and-weave sample set up from the Weaver’s Idea book. I bought some Patons Diploma Gold 4ply in grey and cherry, switched to the 10dpi heddle and set up the warp according to the instructions - 101 different ends.
I started the weaving differently this time. Last time I started straight off with weaving the scarf, and had an inconsistent starting end that didn’t please me. I read a few articles and then a comment in this article which suggested starting like
What the pros do (and I started doing since it’s what they do) is they throw 3 shots (weave 3 picks) and THEN beat those 3 picks (or shots) into place. This will even out the warp.
So, that’s what I attempted. It also mentions doing the hemstitching at this point. So that’s what I did. And then started the weaving project. And wasn’t very happy. The warp still wasn’t very vertical, and was still being pulled towards the centre. So I unwove it (is unwove a word?) and tried again. And then unwove again and decided that despite the rest of the comment above saying that the pros don’t use a “header”, I would. I’m not a pro, I don’t plan to be a pro. I want to be able to produce nice things. And it’s supposed to be about fun.
I did a quick google for header in the weaving context, and found this forum post which says:
I always weave a ‘header’ at the beginning to make sure everything is working as it should, testing my choices of weft yarns, checking for threading errors. Then for a shawl or scarf I advance the warp about 6” for a 3” twisted fringe or an inch or so if I’m hemstitching.
Which matches what it says in my Learning to Weave book that I’d neglected for a while.
So, I put a header in. Life is a bit short and my weaving opportunities are weekly, not daily, so I’d rather advance the rest of my skills, and maybe come back to this header/no header thing later, when everything else is sorted. I then left a gap of 4 or so inches, put in 3 picks of weft and hemstitched this to make a base for the main project. This seemed to work reasonably well but next time I might weave for longer before hemstitching the start as I was a bit cautious about how tight to do the hemstitching.
And so I started weaving, and soon realised that I wasn’t actually getting the balanced weave I expected. So I remeasured my yarn on the ruler against an inch marker and decided that it was actually coming in as 24 rather than 20. So, divide by 2 means that a 12 dpi heddle would be better. Which I didn’t have, so I ordered one (well a 12.5 one) which arrived during the week and is now oiled and ready.
I took a close look at the cloth I’d produced, and had a read of the Learning to Weave book and decided that as I wasn’t going to be able to produce the sampler in a way that would show the different colour combinations off to their best, that I’d try some different things instead. So, I started off by just continuing for a further few inches to keep practicing getting the edges straight - and they’re much improved on the last attempt. I then put a marker thread in (in red) and concentrated on beating the fabric down a lot lighter. This will be interesting to see if after a wash the yarn expands or not. I decided to ring the changes a bit, and practice colour changes and so did a few inches of 2 x red, 2 x grey as well. And then I jumped forward a few chapters in the Weaver’s Idea book and tried using my 2nd, now empty, shuttle as a pick-up stick and did a few variations, which I really liked. My brain is already buzzing with possible combinations of colour and pick up stick use as ways to liven up a mainly plain woven scarf.

I finished the sampler with some loosely beaten plain weave, hemstitched 3 rows to match the start and removed it from the loom before giving it a wash on a 30 degree wool cycle in the machine and then pinning it out to dry.
I am beginning to understand why the suggestion is to do a sample for everything, despite the warping taking a while, as the fabric does look much different off the loom in a relaxed state than on the loom and under tension. For a start, the “gaps” that I was concerned about in the looser beaten weft are much less noticeable.
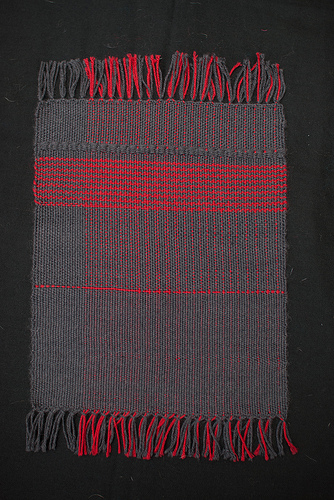
All in all, an enjoyable play project, a noticeable improvement on my scarf, a few more lessons learned and discoveries made. I’m reasonably pleased with the result and very pleased with the learnings.