Weaving project 34: Brown and Red cushion cover
Another weaving as fabric project.
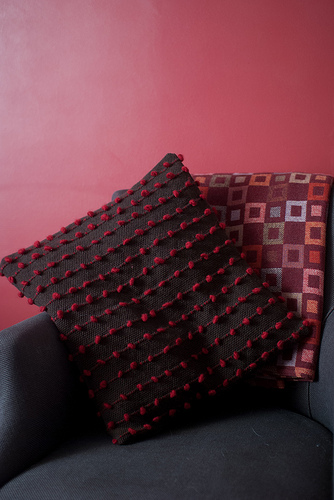
For over a year I’ve been thinking of ways to weave fabric for a cushion cover. My recent cushion cover sewing projects have ended up being relatively successful, so I thought it was time to give this some serious consideration. Early on in weaving project 33 I experimented with loops, and liked how it looked. I knew I had some red yarn left over from the sofa blanket and thought I could combine that with some freshly purchased brown yarn (more Debbie Bliss baby cashmerino as I’d already sampled this) to make a 3d cushion cover.
I wanted to end up with a piece of fabric approximately 20 inches squared. I calculated at 12.5dpi (based on heddle choice) and yarn choice. And so ended up needing around 250 ends. I figured I’d round it up to 256 for easy divisibility purposes (I wasn’t sure whether I was going to work the dots at 4 of 8 warp distances, so an easily divisible number would, I was sure, come in handy later). I calculated warp length at 44 inches - 18 inches for the project, 2 inches as fringe/edging, 2 inches for take-up, 2 inches for shrinkage and then 20 inches loom waste. My loom is 24 inches wide, so this would take up almost all of it, and would be the widest project to date. Warping it was sore on my back and took 2 hours 20 minutes in total.
The pattern
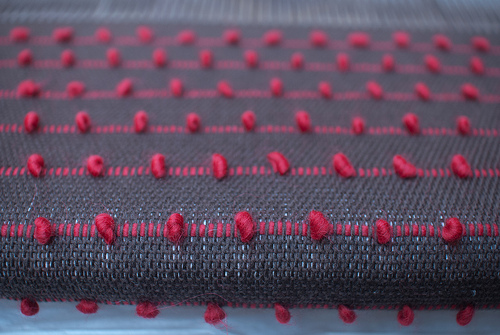
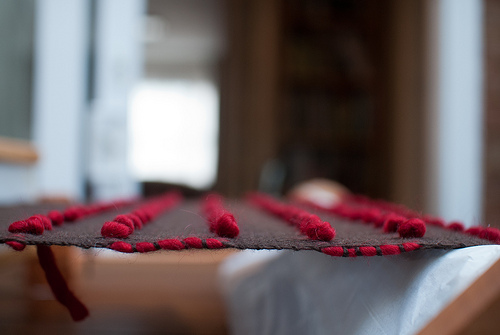
I started as usual with 3 picks for hemstitching, and then wove a further 2 inches. Then I used the red yarn and decided to start at the right hand edge, and put a loop in every 8 warp threads. I used the size 00 knitting needles I rescued from my family home a couple of years ago “just in case”. I’m glad to have found a good use for them. I then wove 9 picks in normal yarn before doing another loops row, this time starting at the left edge and off-setting the loops by 4 to give more depth. It was pretty quick to weave, being finished over the course of a couple of weekend mornings.
Finishing
The fabric, pre-washing/finishing, ended up being 19 inches wide (so still usable, phew!) and 22 inches long. I forgot to allow for a draw-in in the width in my calculations. I finished it as usual — hand washing in mild detergent (the red yarn ran quite a bit) before pinning it out on tea towels on top of blocking boards to dry. I was a bit concerned whether the loops would get pulled out of alignment during the washing/blocking phase, but actually they seemed to hold together remarkably well.
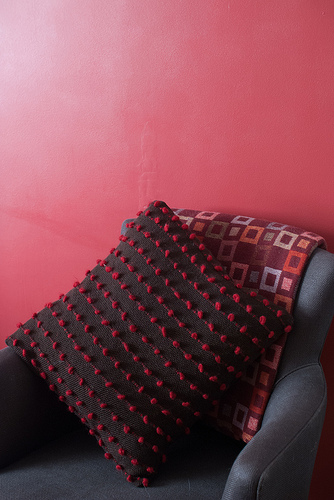
The cushion Cover
After a lot of consideration, I decided to use a brown fabric I bought at Ally Pally for the rear of the cushion cover. I had been around most of the fabric shops in Brighton looking for a good colour match, and there was this one sitting in my fabric box all along. So what if it was intended for another project! Again an envelope style back was in order. And it worked out ok. Eventually. There was a lot of unstitching on one side as the woven piece was so stretchy. But I got there. There are two running stitch rounds and one zig zags around the whole thing. And I haven’t cut any of the weaving this time.
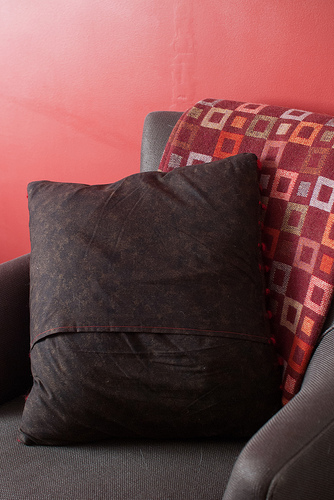
The cushion inner
Having put one of the inners that I had kicking around the house into the cover, it didn’t seem right. It was a bit flat, as shown in the photo just above this paragraph. So I ordered a lovely feather one from Design-a-Cushions. (I bought a new inner for this cushion too).
In conclusion
I’m really happy with every aspect of this. The offsetting of the loops has worked well. The colour match between the back and the front has ended up being pretty good. It feels pretty robust, and the loops have settled in well and don’t feel like they’re going to be pulled out the first time the cushion is used. The feather cushion inner makes it lovely and inviting.
All in all, pretty pleased!