Weaving Project 33: Finger controlled weaves
Having been reasonably happy with the last few weaving projects, I decided that it was time to move on to a new challenge. I’d recently read Chapter 2 of the Weaver’s Idea book and decided that I would do a sampler of different finger controlled weaves - that is patterns that involve interacting with the weft (or warp) with fingers, or knitting needles, or something other than a shuttle. The introduction to the chapter says
“Because you can add finger-controlled weaves anywhere anytime, they are a great resource to tuck into your bag of weaving tricks. Add a highlight, accent, or special border without re-threading or re-warping”
and this seemed a good concept to spend some time exploring.
I spent a little time looking at the pictures and deciding which I’d like to try - and came up with a list of 9. I planned my sampler so that I’d do 2 inches of each different kind and intersperse it with an inch of plain weave to reset the fabric.
I also acknowledged that this was going to take time, and that was fine.
I worked out that I needed 50 inches of warp length (based on 9 2 inch panels, 10 1 inch panels, 2 1 inch fringe and then 20 inches of loom waste). I decided to do 80 warps (for no scientific reason but the fact that it is divisible by quite a few different numbers would be useful). I used a DK yarn (left over from this) for both the warp and the weft.
Section One

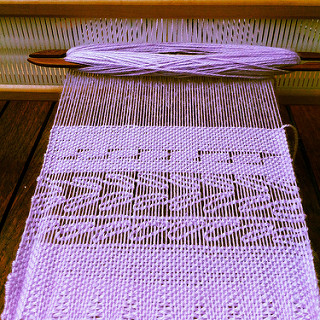
For the first section, I chose to make loops. I used a chunky yarn for this, and for the first 3 rows of loops I used a 00 sized knitting needle. The first row was every 4th space. The second row was again every 4th space but offset. The third row was every other space. Between each of these there were 3 picks of the normal weft. I then did 5 picks of normal weft before doing this sequence again, but using a size 10 knitting needle to see what impact the different sized loop had on the finish. As I still had a little bit of the grey yarn left, I added a 4th row, which left 6 spaces and then did every space before leaving 6 spaces at the end again (if there had been enough yarn then I’d have done every space all the way across, but it didn’t seem to make sense to join yarn for the last row).
This ended up being 1.5 inches, so I finished the 2 inch allowance with plain weft to stabilise the weft again before doing some more plain weave.
Section Two
Kind of two sections actually.
I firstly did two sets of Danish Medallions, again using the chunky yarn I used in section one. I did a medallion every 4 warps and threw 8 picks of normal weft in the middle section. I found maintaining consistency tricky.
I then did a couple of variations. Firstly, crow feet, which I did every 8 warps as with only 4 it looked way too busy. And then double medallions which I rather like the look of.
Section Three
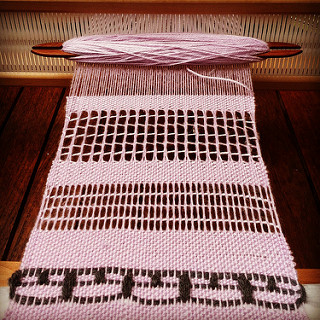
A couple of variations on leno lace.
Firstly I did 1:1 Leno on an open shed. This means that with the shed open, and the right-most warp thread up I had to push the up thread to the left and pull the bottom thread to the right and pass over a pick-up stick. I started off using a ruler as a pick up stick but it wasn’t strong enough, so I swapped over to using an unused shuttle. I did 2 sets of these after each other before weaving an inch or so of plain weave to stabilise before moving on.
Then I decided to do 2:2 Leno, again on an open shed. So, instead of moving one top warp thread aside and picking up one bottom warp thread, I manipulated 2 threads at once. This makes it quicker, but also makes the gaps larger and feel a bit more balanced, at least in this sample. This is my preferred one, which is probably why I did an extra set of these.
Section Four
Variations on Brooks Bouquet.
This is the only type of manipulation I’ve done before - it’s what I used for the bookmarks last Christmas - so I was interested to see what the difference at a larger scale would be. I used 4 warp threads as my bouquet and got on ok with it. I think I prefer the leno effect though. For the variation I used a different coloured yarn, and wrapped the bouquet 4 times. It certainly makes a difference. I found this the hardest one to keep anything close to balanced selvedges with
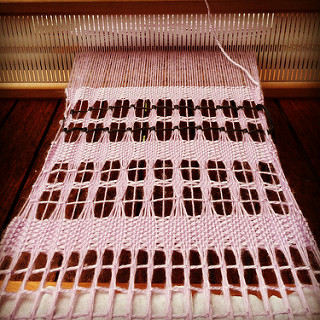
Section Five
Variations on Spanish Lace.
Looking in the book I didn’t think I’d like this, but actually I do. I did a few variations and think the middle section is my favourite. I love the gaps and organic shapes that are caused by doing spanish lace in both directions. The more blocky, filled in version at the top of this section makes me think of waves and the sea, whilst the more open, floaty versions make me think of leaves. I don’t think it is very structurally sound, so it would be a great border, or similar. Whereas the leno lace, I think, is stable enough to do an entire length in (I’m thinking scarf or shawl or something)
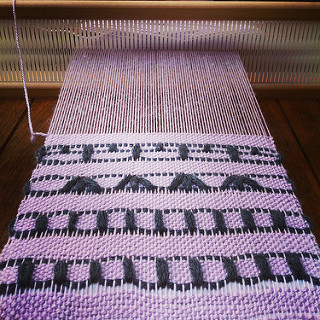
Section Six

Variations on Hemstitching.
I’ve been using hemstitching on my weaving projects since weaving project 3 as a starting and end method. There are more opportunities available though. So I decided to give ladder hemstitching a go - this results in a set of columns which I imagine would look really effective on certain projects. And because they are hemstitched in to place, they are more stable than some of the other methods to get holes into the fabric.
The second variety I used was italian hemstitching. Which is more needlework than weaving as it involves using the fabric as a canvas and stitching into it. I did attempt to do some blackwork but it came out too heavy and poorly defined (probably a bad yarn choice) so I unstitched it and settled for a second repetition of the italian hemstitching instead.
Finishing
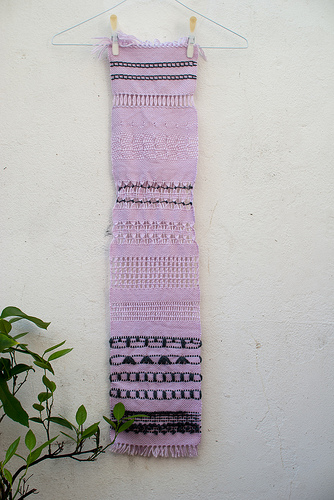
I hemstitched the end in place, and then started unwinding the loom, sewing the ends of the various secondary threads into place as I went. Then into the sink for the traditional soak, rinse and pin session. I wasn’t quite as rough with it in the sink as I sometimes am as I was very concerned with how much abuse some of the more lacier sections would take. Having pinned and dried it out it is reasonably stable and doesn’t feel too much like it’ll disintegrate if I look at it the wrong way.
Finished size: 7 inches x 31 inches
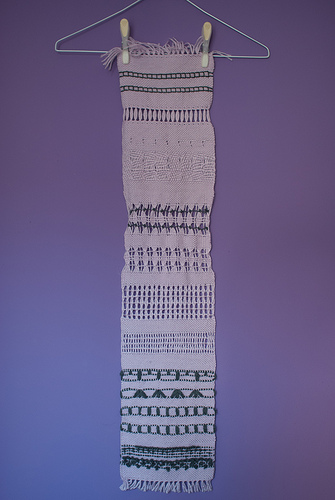
It is currently hanging next to my desk in our home office, hung up on a coat hanger by two clothes pegs. I’m sure there is a better way to display it but, for the moment at least, I quite like having it there for me to look at and see the variety of techniques.