A hand sewn dog treat bag
When trying to decide what to sew next in a determined effort to keep going with simple (but ideally useful) sewing projects one of the things that sprung to mind was making a dog treat bag. I have a dog. She loves treats. I have a nice, but getting tatty, dog treat bag that I bought from codyscreations which has been great in all but one regard - it’s a little bit too easy to open. Resulting in a very happy (and slightly fatter) dog when the bag is left within snout reach.
The best two patterns I found after a quick google were this one and this one but neither were perfect. I did, however, find some perfect fabric.
What I actually want from a dog treat bag is:
1. easyish pattern (I’ll be hand sewing this)
2. has separate compartment for treats and poo bags
3. has a closure that means that a snout can’t get in, but is easy enough to get in to for human hands that it doesn’t become a faff
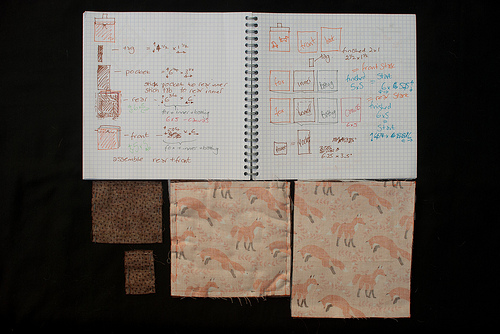
So I got out a notebook and sketched some ideas. And it looked workable. Over the course of the next few weeks I considered it carefully, working out what supplies I needed. I found some lovely companion fabric and a matching thread at C&H Fabrics. I had some batting left over from previous projects. I had some plastic canvas left over from the hat I made - this would be used to make the back piece firmer. I was ready to go.
I redrew my plans, and made measurements based on both my current bag and also my ideal bag. And then I got started and cut out the fabrics.
During my first session of sewing I sewed up the tab, the pocket and attached the pocket to the inside rear piece.
During the second session of sewing I sewed up the rear, double stitching the tab. I had to cut the plastic canvas down to size so I could manipulate it into place but in it went.
During the third session of sewing, a week or two later, I created and bound an eyelet to let the cord through, and started sewing the front section together getting about a third of the way around.
During the fourth session of sewing, a few more weeks later, I sewed the rest of the front section, and tacked the cord to the front of the back to give it some grounding. I hadn’t thought the cord securing bit through well enough, so this is an improvised securing rather than what my initial plan had been. I also pinned the front to the back ready for, hopefully, a final session of stitching.
During the fifth session, I sewed the front pieces and back pieces together. This was tough work, and I ended up with a bleeding thumb so gave up after one full round. I pulled it through to take a look and it looks like it’ll do the job ok. However, the drawstring doesn’t so much close the bag, as make a lovely snout tunnel where I know Skitters will be able to steal treats if I leave it around. But, there isn’t much I can do about that this time - I suspect I should have used some interfacing as a stiffener rather than plastic canvas. Something to try next time.
During my final session I stitched around the bag one final time, this time using a newly purchased thumb protector to prevent further bleeding thumb problems.

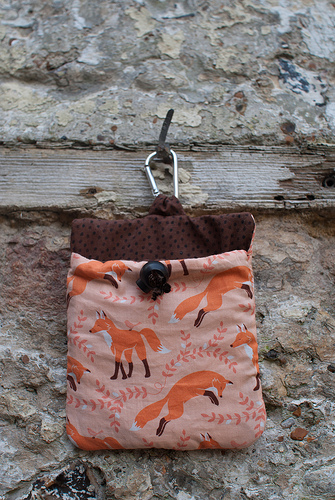
And so it is done. Overall I’m pretty pleased with it and most importantly, it has been worth the effort - I love the fox fabric. It could be finished neater, especially around the bottom as the stitches are visible if you look closely (in real life, not photographically) but generally it isn’t too bad and has turned out pretty much how I envisaged it (and drew it on those initial plans shown above). As I mentioned earlier it won’t stop Skitters from getting at the treats, and so I failed on objective 3, but, this was only attempt one, and so is pretty much a prototype. I’m pretty sure that over the coming years I’ll have many more opportunities to refine and adapt the design based on how I get on with it.